ansible中的变量及加密
本文共 14078 字,大约阅读时间需要 46 分钟。
ansible中的变量及加密
1.变量命名
只能包含数字,下划线,字母只能用下划线或字母开头
2.变量级别
全局: 从命令行或配置文件中设定的paly: 在play和相关结构中设定的主机: 由清单,事实收集或注册的任务变量优先级设定:狭窄范围有限与广域范围
3.变量设定和使用方式
1.在playbook中直接定义变量
---- name: test var hosts: all vars: USER: westosuser


2.在文件中定义变量
vim user_list.yml---user: westosuservim westos.yml---- name: Create User hosts: all vars_files: - ./user_list.yml


3.使用变量
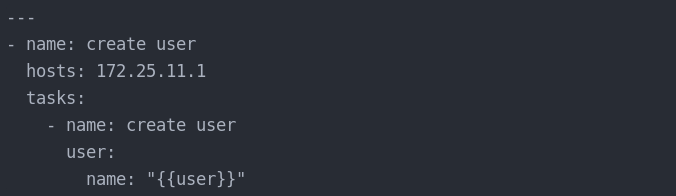
tasks: - name: create user user: name: "{ { USER }}" 4.设定主机变量和清单变量
#在定义主机变量和清单变量时使用vim inventory[westos_list1]172.25.0.254172.25.0.1[westos_list2]172.25.0.2[westos_list3]172.25.0.3[westos_group:children]westos_list2westos_list3[westos_list1:vars]USER=westos1[westos_group:vars]USER=westos2


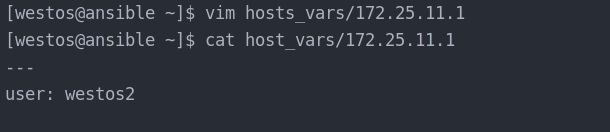
5.目录设定变量
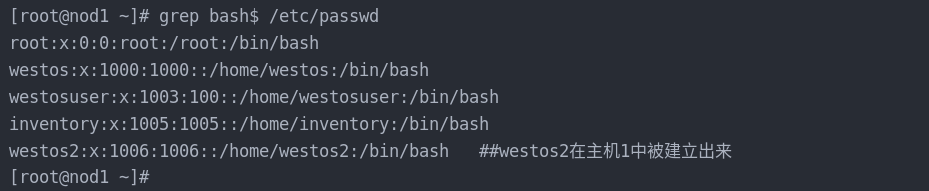
group_vars ##清单变量,目录中的文件名称与主机清单名称一致host_vars ##主机变量,目录中的文件名称与主机名称一致host_vars的内容会覆盖group_vars的内容


[westos@ansible ~]$ ansible-playbook create_user.yml
6.用命令覆盖变量
ansible-playbook user.yml -e "USER=hello"
7.使用数组设定变量
#vim user_var.yml---USER: lee: age: 18 obj: linux westos: age: 20 obj: java#vim user.yml- name: Create User hosts: all gather_facts: no vars_files: ./user_var.yml tasks: - name: create user shell: echo "{ {USER['lee']['age']}}" echo "{ {USER.westos.obj}}" create web vhostwww.westos.com 80 ------> /var/www/htmllinux.westos.com 80 ------> /var/www/virtual/westos.com/linux ####建立两个虚拟主机及设置默认发布测试页########[westos@ansible ~]$ cat vhost.yml ---- name: vhost hosts: 172.25.11.1 vars: - web1: name: www.westos.com port: 80 documentroot: /var/www/html index: www.westos.com page - web2: name: linux.westos.com port: 80 documentroot: /var/www/virtual/westos.com/linux/html index: linux.westos.com page tasks: - name: install web server dnf: name: httpd state: latest - name: configure web server copy: dest: /etc/httpd/conf.d/vhost.conf content: "\n DocumentRoot /var/www/html\n CustomLog logs/default.log combined\n \n\n ServerName { {web1.name}}\n DocumentRoot { {web1.documentroot}}\n CustomLog logs/{ {web1.name}}.log combined\n \n\n\n ServerName { {web2.name}}\n DocumentRoot { {web2.documentroot}}\n CustomLog logs/{ {web2.name}}.log combined\n " - name: create documentroot dir file: path: "{ {item}}" state: directory loop: - "{ {web1.documentroot}}" - "{ {web2.documentroot}}" - name: create index copy: content: "{ {item.index_content}}" dest: "{ {item.index_file}}" loop: - index_file: "{ {web1.documentroot}}/index.html" index_content: "{ {web1.index}}" - index_file: "{ {web2.documentroot}}/index.html" index_content: "{ {web2.index}}" - name: restart apache service: name: httpd state: restarted enabled: yes - name: firewalld configure firewalld: service: http state: enabled permanent: yes immediate: yes
[westos@ansible ~]$ ansible-playbook vhost.yml ###运行成功####PLAY [vhost] ***********************************************************************************************************************TASK [Gathering Facts] *************************************************************************************************************ok: [172.25.11.1]TASK [install web server] **********************************************************************************************************ok: [172.25.11.1]TASK [configure web server] ********************************************************************************************************ok: [172.25.11.1]TASK [create documentroot dir] *****************************************************************************************************ok: [172.25.11.1] => (item=/var/www/html)ok: [172.25.11.1] => (item=/var/www/virtual/westos.com/linux/html)TASK [create index] ****************************************************************************************************************ok: [172.25.11.1] => (item={'index_file': '/var/www/html/index.html', 'index_content': 'www.westos.com page'})ok: [172.25.11.1] => (item={'index_file': '/var/www/virtual/westos.com/linux/html/index.html', 'index_content': 'linux.westos.com page'})TASK [restart apache] **************************************************************************************************************changed: [172.25.11.1]TASK [firewalld configure] *********************************************************************************************************ok: [172.25.11.1]PLAY RECAP *************************************************************************************************************************172.25.11.1 : ok=7 changed=1 unreachable=0 failed=0 skipped=0 rescued=0 ignored=0 在主机中做好解析访问[root@haha Desktop]# cat /etc/hosts127.0.0.1 localhost localhost.localdomain localhost4 localhost4.localdomain4::1 localhost localhost.localdomain localhost6 localhost6.localdomain6172.25.11.1 www.westos.com linux.westos.com


另一种练习


8.注册变量
#register 把模块输出注册到指定字符串中---- name: test register hosts: 172.25.0.254 tasks: - name: hostname command shell: hostname register: info - name: show messages shell: echo "{ {info['stdout']}}" 

屏蔽错误输出[westos@ansible ~]$ cat var.yml ---- name: test register hosts: 172.25.11.1 tasks: - name: test shell: test -e /mnt/file ignore_errors: yes ##忽略错误输出继续执行 register: westos - name: show westos debug: msg: "{ {westos.rc}}" ## 输出rc,成功rc=0.失败rc=1 [westos@ansible ~]$ ansible-playbook var.yml PLAY [test register] ***************************************************************************************************************TASK [Gathering Facts] *************************************************************************************************************ok: [172.25.11.1]TASK [test] ************************************************************************************************************************fatal: [172.25.11.1]: FAILED! => {"changed": true, "cmd": "test -e /mnt/file", "delta": "0:00:00.005763", "end": "2020-09-13 06:44:56.752272", "msg": "non-zero return code", "rc": 1, "start": "2020-09-13 06:44:56.746509", "stderr": "", "stderr_lines": [], "stdout": "", "stdout_lines": []}...ignoringTASK [show westos] *****************************************************************************************************************ok: [172.25.11.1] => { "msg": "1" ##输出的错误结果}PLAY RECAP *************************************************************************************************************************172.25.11.1 : ok=3 changed=1 unreachable=0 failed=0 skipped=0 rescued=0 ignored=1 9.事实变量
事实变量是ansible在受控主机中自动检测出的变量事实变量中还有与主机相关的信息当需要使用主机相关信息时不需要采集赋值,直接调用即可因为变量信息为系统信息所以不能随意设定仅为采集信息,故被成为事实变量---- name: test register hosts: 172.25.0.254 tasks: - name: show messages debug: msg: "{ {ansible_facts['architecture']}}" 


抓取受控主机的ip,主机名,等等[westos@ansible ~]$ cat hosts_messages.yml ---- name: test register hosts: 172.25.11.1 tasks: - name: test copy: dest: /mnt/hosts_messages content: "{ {ansible_facts.enp1s0.ipv4.address}}\n { {ansible_facts.fqdn}}\n { {ansible_facts.memtotal_mb}}"ansible-playbook hosts_messages[root@nod1 www]# cat /mnt/hosts_messages ###在受控主机中可以看到抓取的ip及主机名及内存172.25.11.1nod1.westos.com726 10.魔术变量
hostvars: ##ansible软件的内部信息group_names: ##当前受管主机所在组groups: ##列出清单中所有的组和主机inventory_hostname: ##包含清单中配置的当前授管主机的名称
ansible 192.168.3.1 -m debug -a 'var=groups' 列出清单中所有的组和主机ansible 192.168.3.1 -m debug -a 'var=hostvars' ansible软件的内部信息ansible 192.168.3.1 -m debug -a 'var=inventory_hostname' 包含清单中配置的当前授管主机的名称


JINJA2模板
介绍
Jinja2是Python下一个被广泛应用的模版引擎他的设计思想来源于Django的模板引擎,并扩展了其语法和一系列强大的功能。其中最显著的一个是增加了沙箱执行功能和可选的自动转义功能
j2模板书写规则
{# /etc/hosts line #}127.0.0.1 localhost{ { ansible_facts['all_ipv4_addresses'] }} { {ansible_facts['fqdn']}}#for循环#vim users.ymlusers: - westos - linux - ansiblevim test.j2{% for NAME in users %}{ { NAME }}{%endfor%}#if 判定#{% for NAME in users if not NAME == "ansible" %}User number { {loop.index}} - { { NAME }}{%endfor%}loop.index ##循环迭代记数从1开始loop.index0 ##循环迭代计数从0开始{% for user in students %}name: { {user['name']}}{%if user['age'] is defined%}age: { {user['age']}}{%endif%}{% if user['age'] is not defined %}age: null{% endif%}obj: { {user['obj']}}{%endfor%} j2模板在playbook中的应用
#playbook1 ---- name: test register hosts: xxxx tasks: - name: create hosts template: src: ./xxxx.j2 dest: /mnt/hosts#playbook2---- name: test.j2 hosts: 172.25.0.254 vars: students: - name: student1 obj: linux - name: student2 age: 18 obj: linux tasks: - template: src: ./test.j2 dest: /mnt/list


[root@server1 ansible]# vim httpd.conf httpd.conf.j2[root@server1 ansible]# vim httpd.conf.j2 Listen { { http_port }} 


[root@server1 ansible]# vim webserver.yml 8000[root@server2 ansible]# getenforce Enforcing[root@server2 ansible]# setenforce 0[root@server2 tmp]# curl localhost:8000www.westos.org[root@server1 ansible]# ansible-playbook -e "http_port=80" webserver.yml [root@server1 ansible]# curl 192.168.0.2www.westos.org[root@server1 ansible]# vim webserver.yml [root@server1 ansible]# ansible-playbook webserver.yml [root@server1 ansible]# curl 192.168.0.2:8080www.westos.org
Ansible的加密控制
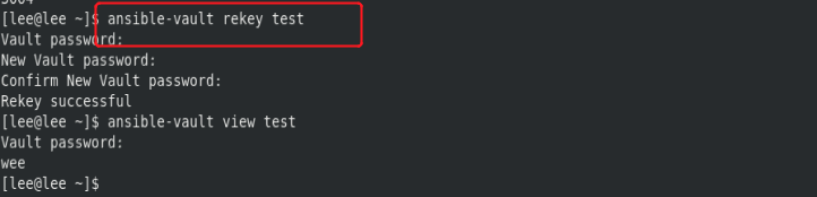
#创建建立文件1.ansible-vault create westos2.vim westos-vault leeansible-vault create --vault-password-file=westos-valut westos#加密现有文件ansible-vault encrypt test#查看加密文件ansible-vault view westosansible-vault view --vault-password-file=westos-valut westos#编辑加密文件ansible-vault edit westos1ansible-vault edit --vault-password-file=westos-valut westos##解密文件ansible-vault decrypt westos ##文件永久解密ansible-vault decrypt westos --output=linux ##文件解密保存为linux##更改密码ansible-vault rekey westos1ansible-vault rekey westos1 --new-vault-password-file=key1#playbook#ansible-playbook apache_install.yml --ask-vault-pass


上课做的一些练习(大的yml分成各个部分的yml,并将其playbook或者tasks导入、用playbook进行网页用户认证、变量的练习)
[root@server1 ansible]# vim webserver.yml - import_tasks: task.yml #取消注释[root@server1 ansible]# ansible-playbook webserver.yml [root@server1 ansible]# vim task.yml- name: Check that a page returns a status 200 uri: url: "http://172.25.15.2:{ { http_port }}" return_content: yes status_code: 200 register: result[root@server1 ansible]# ansible-playbook webserver.yml 
## 登陆网页需要进行用户认证[root@server2 conf]# cd /var/www/html[root@server2 html]# lsindex.html[root@server2 html]# vim .htaccessAuthType BasicAuthName "westos auth"AuthUserFile /etc/httpd/conf/htpasswdrequire valid-user[root@server2 httpd]# htpasswd -c /etc/httpd/conf/htpasswd linuxNew password: Re-type new password: Adding password for user linux[root@server2 httpd]# htpasswd /etc/httpd/conf/htpasswd adminNew password: Re-type new password: Adding password for user admin[root@server2 httpd]# cat /etc/httpd/conf/htpasswdlinux:$apr1$903QlUf9$tGUxGQRLh58AtzxgnIcKf0admin:$apr1$ai0ZpQvF$C1eoNHR5KwYt7T7GE7nVR1[root@server2 html]# l.. .. .htaccess[root@server2 html]# pwd/var/www/html
[root@server2 html]# scp .htaccess server1:/mnt/ansible/[root@server2 html]# scp /etc/httpd/conf/htpasswd server1:/mnt/ansible/[root@server1 ansible]# pwd/mnt/ansible[root@server1 ansible]# lsansible.cfg apache database.yml hosts playbook.yml[root@server1 ansible]# ansible-playbook apache/webserver.yml [root@server1 ansible]# curl 192.168.0.2:8080401[root@server1 apache]# vim webserver.yml 80[root@server1 apache]# vim httpd.conf.j2 AllowOverride All[root@server1 apache]# l.. .. .htaccess[root@server1 apache]# mv .htaccess htaccess[root@server1 apache]# ls[root@server1 apache]# vim webserver.yml [root@server1 ansible]# ansible-playbook apache/webserver.yml [root@server1 ansible]# curl 192.168.0.2401


[root@server1 ansible]# vim apache/webserver.yml [root@server1 ansible]# vim apache/task.yml ---- name: Check webserver uri: url: "http://192.168.0.2:{ { http_port }}" user: linux password: westos return_content: yes status_code: 200 register: result- debug: var: result[root@server1 ansible]# ansible-playbook --list-tasks apache/webserver.yml[root@server1 ansible]# ansible-playbook --start-at-task "Check webserver" apache/webserver.yml [root@server1 ansible]# vim apache/task.yml [root@server1 ansible]# ansible-playbook apache/task.yml[root@server1 ansible]# vim apache/webserver.yml - import_playbook: task.yml ##最后[root@server1 ansible]# ansible-playbook apache/webserver.yml


[root@server1 ansible]# vim apache/webserver.yml - name: create index.html copy: content: "{ { ansible_hostname }}\n" dest: /var/www/html/index.html#- import_playbook: task.yml[root@server1 ansible]# vim apache/httpd.conf.j2 AllowOverride None[root@server1 ansible]# ansible-playbook apache/webserver.yml [root@server1 ansible]# curl 192.168.0.2server2[root@server1 ansible]# curl 192.168.0.3server3 [root@server1 ansible]# vim playbook.yml ---- hosts: all tasks: - name: system info template: src: hostinfo.j2 dest: /tmp/hostinfo[root@server1 ansible]# vim hostinfo.j2hostname: { { ansible_facts['hostname'] }}ip: { { ansible_facts["enp1s0"]["ipv4"]["address"] }}DNS: { { ansible_facts['dns']['nameservers'][-1] }}vad1: { { ansible_facts['devices']['vda']['partitions']['vda1']['size'] }}kernel: { { ansible_facts['kernel'] }}[root@server1 ansible]# ansible-playbook playbook.yml[root@server2 html]# cat /tmp/hostinfo hostname: server2ip: 192.168.0.2DNS: 114.114.114.114vad1: 1021.00 MBkernel: 4.18.0-193.el8.x86_64[root@server1 ansible]# vim apache/httpd.conf.j2 Listen { { ansible_facts["enp1s0"]["ipv4"]["address"] }}:{ { http_port }}[root@server1 ansible]# ansible-playbook apache/webserver.yml [root@server2 html]# netstat -antlptcp 0 0 192.168.0.2:80 0.0.0.0:* LISTEN 40700/httpd 


IP负载均衡、变量与角色编写
链接: .
转载地址:http://onhzi.baihongyu.com/
你可能感兴趣的文章
通俗易懂解剖jbpm4
查看>>
rsync
查看>>
makefile
查看>>
linux 文件权限
查看>>
一些比较好的golang安全项目
查看>>
HTTP状态码
查看>>
go语言
查看>>
mysql mariaDB 以及存储引擎
查看>>
游戏行业了解介绍
查看>>
linux at 命令使用
查看>>
Go在windows下执行命令行指令
查看>>
inotify
查看>>
inode
查看>>
Shell: sh,bash,csh,tcsh等shell的区别
查看>>
golang ubuntu 配置 笔记
查看>>
vim 常用命令
查看>>
golang 开源项目
查看>>
ubntu 开发服务进程
查看>>
linux 常用命令以及技巧
查看>>
记录1年免费亚马逊AWS云服务器申请方法过程及使用技巧
查看>>